Mounting your wall planner
Ready to get organised?
Here's some helpful tips on how to mount and care for your new Planner. We're always happy to chat on the phone about the best way to securely mount your planner to the wall - so don't hesitate to get in touch via phone (03 9070 8156) or email (hello@arloandco.com.au).
Scroll down to find your Planner product below 👇🏼
BUSY KIDS WEEKLY PLANNERS / CHORE CHARTS
Your Planner or Chore Chart should be screwed it into your wall so it is held and supported securely. Chatting to your local hardware store is a great way to determine the perfect screw or hardware for your wall surface.
Please give us a call if you have any questions at all prior to mounting your planner or chore chart - we're available via phone or email from Monday to Friday, and always happy to help!
To mount,
1. Clean the wall surface and allow to dry.
2. Peel back the cover on the clear adhesive on the back of the 4 round mounts.
3. Ensure the Chart or Planner is level and even, and positioned exactly where you'd like it to be.
4. Press down very firmly on each mount for 20-30, seconds to ensure it is affixed to the wall while you secure with screws appropriate for your wall.
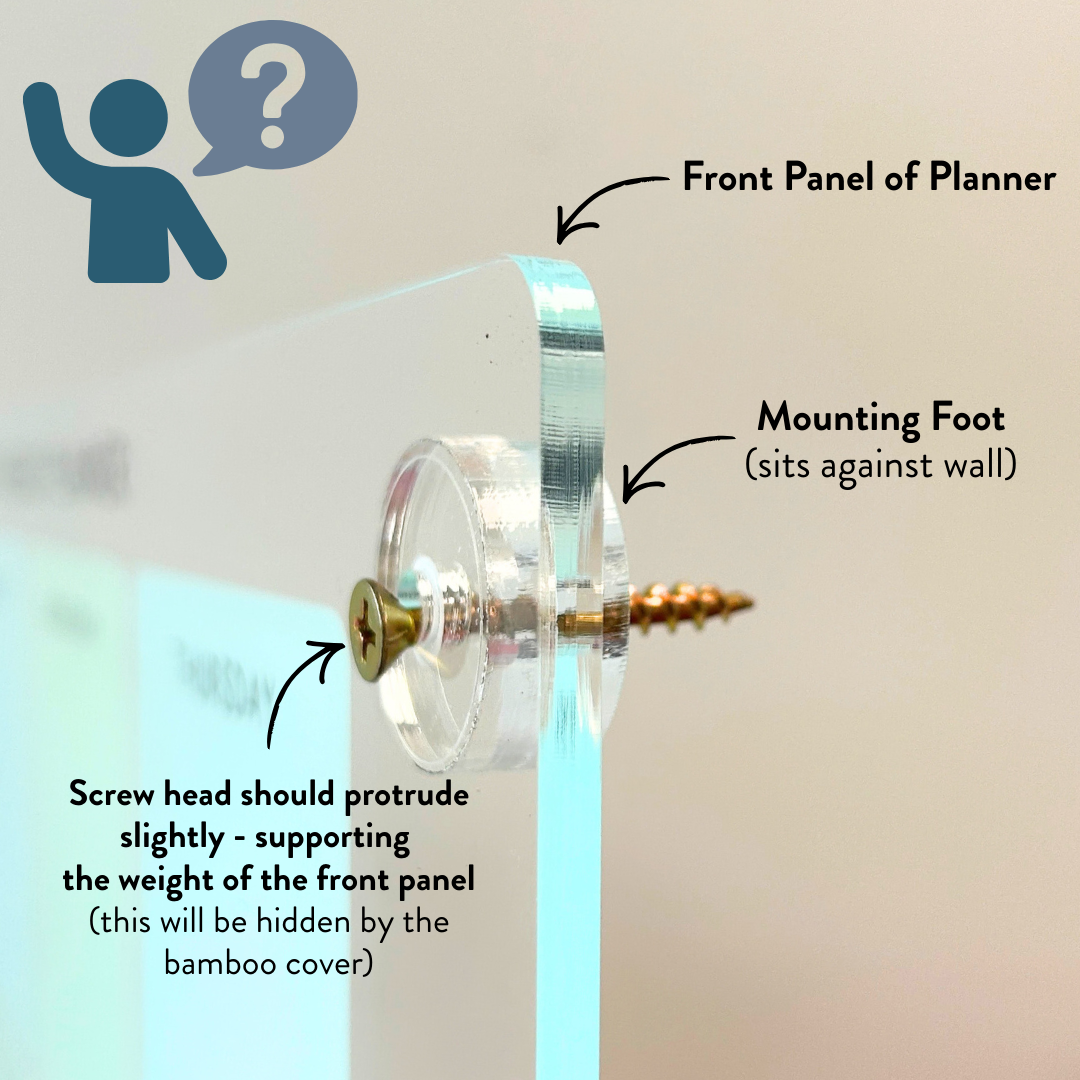
5. Use screws to secure your Planner to the wall, ensuring the head of the screw is also supporting the front panel. (ie, the head of the screw should be sitting just in front of the front panel of your planner).
5. Remove the adhesive backing on the 4 x round bamboo covers. Press these securely onto the front of the planner, to cover the wall mounts and screws. Take care to line up the grain of the bamboo horizontally. Note, if you think you may need to move your chore chart in the future, it is a great idea to use blue-tack to pop your bamboo covers on so that you can easily get to the screws beneath in future.
6. Get busy planning chores and rewards! 👌🏽
If you have any questions regarding your planner, please do contact our customer service on 03 9070 8156. We're here to help!
HOUSEHOLD PLANNER
Your Household Planner should be secured to the wall it into your wall where you'd like to mount it. Chatting to your local hardware store is a great way to determine the perfect screw or hardware for your wall surface.
Please give us a call if you have any questions at all prior to mounting your planner - we're available via phone or email from Monday to Friday, and we're always happy to help!
To mount,
1. Clean the wall surface and allow to dry thoroughly.
2. Peel back the cover on the clear adhesive pieces (enclosed in your order) on the back of the 4 x round mounts.
3. Ensure the Planner is level and even, and positioned exactly where you'd like it to be.
4. Press down very firmly on each mount for 20-30, seconds to ensure it is completely affixed to the wall while you secure with screws appropriate for your wall.
5. Use screws (suitable for your wall) to secure your Planner to the wall, ensuring the head of the screw is also supporting the front panel. (ie, the head of the screw should be sitting just in front of the front panel of your planner).
5. Remove the adhesive backing on the 4 x round bamboo covers. Press these securely onto the front of the planner, to cover the wall mounts, ensuring you line up the grain of the bamboo. Note, if you think you may need to move your planner in the future, it is a great idea to use blue-tack to pop your bamboo covers onto the planner so that you can easily get to the screws beneath in future.
6. Get busy getting organised! 👌🏽
If you have any questions regarding your planner, please do contact our customer service on 03 9070 8156. We're here to help!
MONTHLY FAMILY PLANNER
Your Monthly Family Planner must be mounted to the wall using screws. Chatting to your local hardware store is a great way to determine the best screw or hardware for your wall surface. The adhesive on the back of the planner can be used to hold it in place whilst you use the screws to completely support it.
Please give us a call if you have any questions at all prior to mounting your planner - we're available via phone or email from Monday to Friday, and we're always happy to help!
1. Clean the wall surface and allow to dry thoroughly.
2. Peel back the cover on the adhesive on the back of your planner.
3. Ensure the Planner is level and even, and positioned exactly where you'd like it to be.
4. Press down very firmly on each mount for 20-30, seconds to ensure it is affixed to the wall while you secure with screws.
5. Use screws (suitable for your wall) to secure your Planner to the wall, ensuring the head of the screw is also supporting the front panel. (ie, the head of the screw should be sitting just in front of the front panel of your planner).
5. Remove the adhesive backing on the 4 x round bamboo covers. Press these securely onto the front of the planner, to cover the wall mounts, ensuring you line up the grain of the bamboo. Note, if you think you may need to move your planner in the future, it is a great idea to use blue-tack to pop your bamboo covers onto the planner so that you can easily get to the screws beneath in future.
PERSONALISED WEEKLY PLANNER
Your planner comes with magnets, so you can pop it straight up on the fridge!
If you’d prefer to attach your planner to the wall, many customers have found that blu-tack or removable Command 3M strips [cut to size and placed behind the bamboo header and footer] will give great hold for these light-weight pieces.
Please note, the best adhesive for your wall will depend on the particular surface. Your local hardware store is the best place to get advice.
If you have any questions regarding adhesives, please do contact our customer service on 03 9070 8156. We're here to help!
USE AND CARE OF YOUR PLANNER
Use a regular dry-erase or whiteboard marker. (A fine or bullet-point marker works well for precise, clear writing).
You can clean the front of your board just like you would a whiteboard. A soft, microfibre cloth works well, and you can use a gentle household cleaner for anything which needs extra help, like little finger prints. Avoid harsh chemicals, scourers or scrubbing to make sure your lovely planner doesn't get scratched.
And of course, if you have any questions at all about any of the above, please don’t hesitate to get in touch via email on hello@arloandco.com.au or calling our studio on 03 9070 8156.
HAPPY PLANNING!